Monday, June 30, 2008

Engine and Transmission Removal

As the title suggests, we were able to get the engine and tranny out this weekend. I had prepped everything during the week so really all we had to do was hook up the engine hoist and we were ready to go.


Header clearance is a definite problem here. Once we got the engine lifted up a couple of inches we had to take the headers out through the bottom of the engine bay. The other thing that gave me some trouble was the shifter linkage on the tranny. It got stuck on the transmission tunnel, and we had to drop the engine/tranny back into the car so I could remove the shifter. After this it came out with little to no issues.


In the pics below you will see where I had some problems. When the transmission snagged on the tunnel the engine slid sideways and bent the upper radiator support. I could easily reshape the part, but after giving it a "once-over", I decided the piece will be replaced using parts from National Parts Depot. They have the part in 18ga. sheet metal versus the 20ga. Ford used. When the motor goes back in the car it will have significantly more power; I think the heavier sheet metal will be good thing.


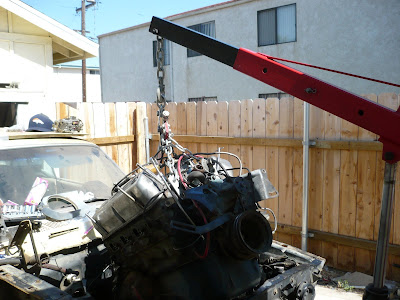
Here it is coming out of the car.


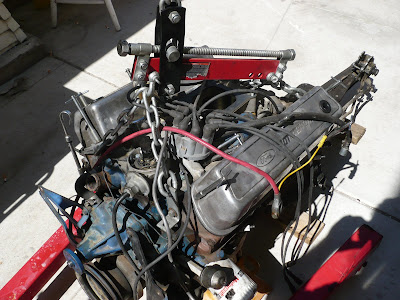
I have it in the driveway for now, but will be storing in the shed soon.


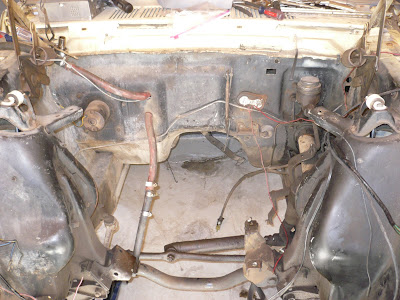
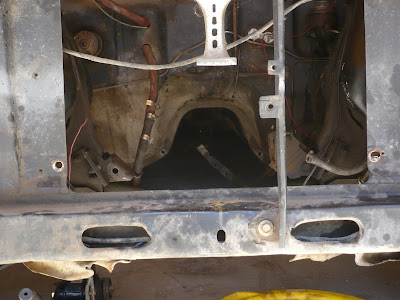
The empty engine bay. Still lots of work to do in here, having the engine out should make that easier.


The damage I did. I think the oil pan got it.


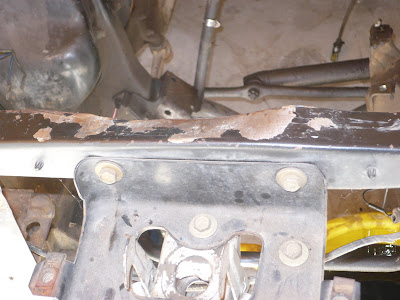
The damage that was already done. If you look closely, you can see that the strut rod mounts are also bent pretty bad. The replacement part includes the front cross-member as well. The more I think about it and look at the damaged area, the more I think I am making the right decision on replacing the whole thing.


Since I had the headers out, I went ahead and removed the exhaust pipes as well. No pics of that though. I have some clean up to do, and have to get the car, parts, and tools back in the garage. If you have any questions about this, or want some tips for your engine/transmission removal, email me, or leave a comment. I will be glad to help.

Monday, June 23, 2008

Drive Shaft

I almost forgot... I pulled the drive shaft out today as well. A couple of the nuts on the U-bolts were a little loose which is kind of scary. I haven't driven the car in quite awhile, but I can only imagine the damage that would have done if it had came out while I was flying down the highway at 80, err 65 mph.

Radiator And Headers. Plus Pics With New Camera

It has been hot here in southern California, but that didn't stop me. It just slowed me down. I got up early to beat the heat, but that didn't work out so well, it was hot when I walked out the door. I still managed to get the radiator and motor drained. I removed the radiator and disconnected the headers which, anyone who has worked on these old mustangs will tell you, is a chore. The second and third pictures show the clearance between the headers and the shock towers. No big deal for now, but thinking ahead, I may have some concerns when it comes time to squeeze the motor back in between two freshly painted shock towers. I'll cross that bridge when I get there.

Back on topic, I pulled the alternator and power steering pump, disconnected the heater hoses, gas line, and all the wiring. I still have the motor and transmission mounts connected, as well as the clutch, choke and throttle linkage. I'm in no hurry here, but I think I might have the engine and transmission out next weekend.

As for the camera, well, in my opinion it doesn't take the best pictures, but if not for it, I would missed some of the pictures I took today. There is no way I would have grabbed either of my other cameras with the greasy-grimy hands I ended up with after today's work.

Things are moving right along even if it is a snails pace, but like I said before, the engine and transmission will be coming out soon, and you don't want to miss that milestone, so stay tuned.

Radiator removal on this car is ridiculously easy.
The above mentioned header clearance

Tuesday, June 17, 2008

No Work This Weekend

I got the crud that seems to be going around out here so work on the car is on hold for the time being. I did get a couple of books from JBA performance in Kearney Mesa this week, one is a chassis book and the other is the body book. Bought a wiring diagram as well so the week was not a total loss.

I intend to get a list of vendors I use posted on the site as well. JBA will be the first, but I'm sure the list of vendors will grow fast after I get the thing stripped.

Oh, Rhonda bought me a new digital camera for the project. It was a cheapo, but that beats ruining one or both of my good cameras. Hopefully I'll get over this flu, and post some pictures with it soon.

Monday, June 9, 2008

The Cowl part II

More Pics of the cowl. Scroll down or click here to read part I if you missed it. The one downside to using a blog to chronicle this build it that the most recent thing is always first, oh well.


This is the driver's side as well taken from between the kick panel and the vent.

Passenger's sideMore passenger's side

Taken through the ashtray just to give an idea of the condition from the interior of the car.

The Cowl part I

The question here is this: Do I need to remove the vent above the cowl to inspect it or can looking it over real good from the outside satisfactorily determine if it is in good enough shape. I will post this question on one of the boards I follow, and see what the people there have to say. I seem to think it's a tweener, in other words, It's not real bad, but not real good either which is why I need some help.

The picture below is the passengers side. The cowl drain was clear, but there was some debris.(pine needles and such.)
Another of the passengers side just to give an idea to the overall condition of the area.

Drivers side again overall condition. The drain on this side was clear as well. This didn't come out the best, but this was taken through the inspection hole in the cowl.(click to enlarge for better view)
Drivers side from the interior where the cowl vent connects.


Yes, I have had some help

For those wondering if I am working on this alone, or if I have help; I have to come clean. I have had some help on this project. Though I have to say, with help like this I don't need anything to go wrong.


On a serious note. I bought some wheel dollies from Harbor Freight this weekend. If you are thinking about getting the HF wheel dollies, don't. Rhonda helped me turn the car around in our driveway, but that is about all they are good for. Once we got the car turned around, we couldn't get it to move in a straight line back into the garage. I had to take the car back off the dollies to get in the garage, which is when I noticed that my little floor jack is not going to be big enough for this job. I ended up putting the floor jack on some 2x4s just to get the car high enough to get the dollies out from under the tires. All in all, they got the job done, but it wasn't easy. On the other hand, I think once I get the engine and tranny out of the car it will move around a lot easier.

Wiring

Had a great visit with the fam, but now its time to get back to work. I got most of the wiring removed from the interior of the car. This should be real fun to reinstall.

This pic shows the dash minus all the wiring, gauge cluster and controls. I still haven't removed the heater controls, or the glove box at this point. Also the heater core, windshield wiper linkage, and air handler are still under the dash. I am going to get the engine out before I remove these items. As for the interior I still have the door panels and rear quarters to remove.

This one is a quick pic to remind me of where the wiring harness comes through the firewall.

Another showing where the fuse block was located. (Note the screw in the middle of the pic.)
And another showing where the wiring harness goes through the firewall.

Other than the previously mentioned door panels, and rear quarter panels, I am almost done with the interior for the time being. I am going to wait to remove the pedals until I have the engine out. Same goes for the heater core, and windshield wiper assembly. That's all for now.

Thursday, May 29, 2008

Just a thought

I have been toying with the idea of making a few videos and maybe some tech articles as I do this project. This video is not the best and would have been better if it had been shot in the car, but I don't have a tripod. See what you think.

Wednesday, May 21, 2008

Rustang

Actually working on the Mustang here!


Three words: LOTS of RUST!


No surprise here. I knew I would find lots of rust. I pulled the seats and the carpet tonight, and what I found was a few holes and a quite a bit of rust. I have seen worse so I am not too worried. The only thing that bothers me is the rust in the front panels.


As you can see below the interior is pretty ratty. I pulled the seats tonight which requires a 1/2inch deep-well socket and and extension. I suspect the drivers seat has been out of this car before because the plugs the cover the seat fasteners under the car were missing on the drivers side and there were only three nuts holding it in place.


I took this picture to remind me of how the brackets between the seats and the floor are installed.
Rhonda must have snapped this one while I wasn't looking. I just now noticed it myself. This is the worst of the rust. Yeah, that is a hole clear through the floorboard. It is right behind the drivers seat. Kinda scary.


While the rust here doesn't look as bad, it has me worried because this area usually rusts because the cowl is rusted. There is about 300 spot welds (not an exaggeration) that will have to be drilled out if I need to replace the cowl.

Hopefully there will be more this weekend!